* 2nd place winner in CheckMate Tools Contest
– Tested with 3ds Max 9.0 sp2 – 3Ds Max 2012
Installation:
Option 1: (Easiest with max runing)
– Go to MAXScript -> Run Script
And choose the provided file: pX Tools-SceneInspector.mcr
Max automatically will create a copy of this macro in your user macros directory permanently.
Option 2: (need max restart)
– Look for your user macros directory (Configure System Paths-> Additional Macros)
– Copy there the provided file: pX Tools-SceneInspector.mcr
– Restart max application.
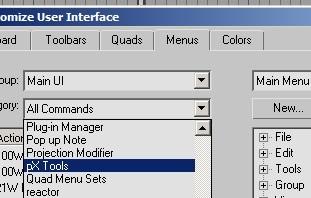
Once installed, you can find the menu shortcut called SceneInspector within category pX Tools. Drag and drop it to your desired menu group or toolbar.
Current scene inspection
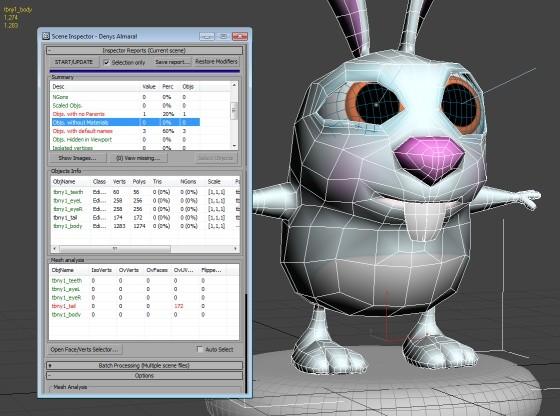
Open your max file and click your shortcut to SceneInspector macro, then click START/UPDATE button.
Selection only (check box): Check Selection only if you want to run the inspection only for selected objects.
Save Report (button): When completed, the process allows us to save reports as HTML, XML, CSV.
Restore Modifiers (button) restores all modifications needed for inspection so the scene objects go back to their original state.

Wait until the process is completed, and examine the results in the following tables:
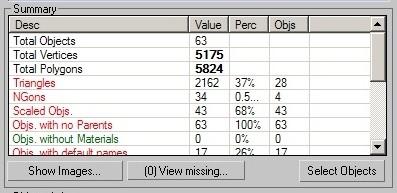
Summary report:
Lists total and summarized values (Value), percent from the total (Perc) and amount of objects affected (Objs). The Description part (Desc) will appear in red for problematic values, black for neutral or green for ok.
Clicking the Select Objects button will select all the affected objects by the currently selected item in the list. The same action occurs using the Double-Click.
ViewMissing button shows all missing files for the current scene.
Show Images button displays rendered scene image and Viewport captures.
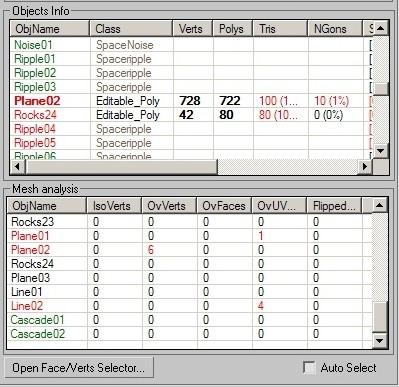
Objects Info and Mesh analysis reports:
Objects Info lists all inspected object properties and polygon counts, tris, NGons. This info is obtained quickly without too many computing calculations. Mesh analysis lists only geometric objects and their mesh analysis results. These are the most computing expensive calculations for detecting problems like overlapping faces/vertices and flipped faces.
Problematic values are shown in the red color.
Objects names (ObjName) color legend is defined as follows:
Red object name: At least one problem listed in this table.
Bold-red object name: At least one problem including the default object name problem.
Black object name: No problem in this table, but it does have a problem in the other.
Green object name: No problems found in any of the two tables.
Double-click to select the associated object with the current item. You can also check Auto Select for select associated objects with a single click.
Open Face/Verts Selector: (Sub-Object Selection mini-tool)
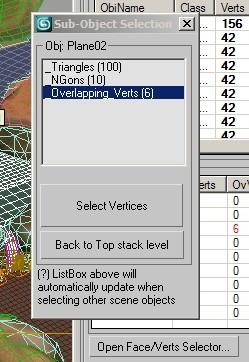
After it has finished processing the scene, this Sub-Object Selection mini-tool is automatically opened, or you can manually open it clicking Open Face/Verts Selector button. This is a very useful feature to go object by object in selecting problematic faces or vertices as results from the recently processed scene.
It automatically updates when an object is selected, showing a list of the possible selections you can highlight. Try clicking the Select Vertices/Faces button.
Since it is uncomfortable to select another object when a sub-object face/verts is selected, a second button will help you go back quickly to the top of the object Stack so you can select another object from the scene.
Remember, you can also invoke single object selection directly from Object Info and Mesh analysis tables by double-clicking them.
Batch Processing (Multiple scene files)

The second section of this tool is Batch Processing. Use the Scan folders button to search for .MAX scenes inside subdirectories recursively starting by a specified folder.
As button names indicate that they can be added as single files, remove selected, remove all and click Open file to load the scene into max.
Click the START button to process all listed files.
NOTE: The process can’t be paused, if you want to abort, hold the ESC key for a few seconds. Maxscript didn’t support multithreading or any solution to refresh user input from visual controls while running intensive calculations code.
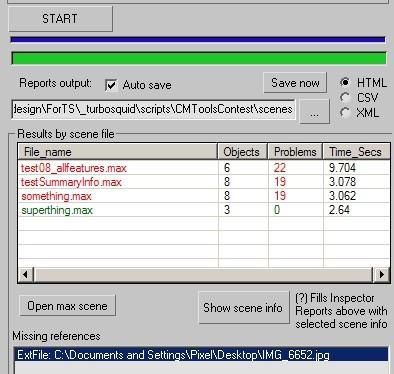
Batch processing results/autosave reports:
After it has finished processing all files, a message is shown with a beep alert.
Auto save checkbox checked reports will be saved automatically with the chosen format (HTML|CSV|XML). If you would like to save the reports using another format, select it and click the Save now button. Reports will be generated again with the desired file format.
File names are created automatically with the following format:
“siRep_” + FileNumber + MaxFileName + “.html|.csv|.xml”
For example scene test08_allfeatures.max report file name will be: siRep_1_test08_allfeatures.html
The table Results by scene file shows the processed scenes with minimum info: objects count, the number of problems found, and processing time in seconds.
Select an item from this list and click Show scene info button. This fills the Inspector Reports section above with all test results. Scroll up to check Summary, Object Info and Mesh Analysis.
If you want to open any scene from the list, click the Open max scene button.
Missing references shows a list of any missing file/DLLs/XRefs detected when opening each scene file.
Options
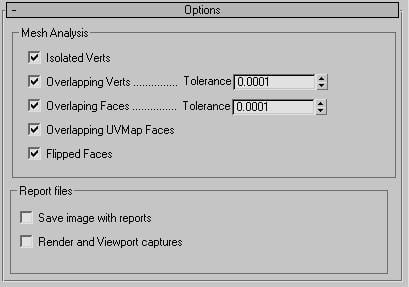
Check/uncheck options in order to disable Mesh Analysis tests and set the Tolerance values.
Specify if you want to generate Render and Viewport captures and if you want to save them with reports.
The tool will remember these options for all the current sessions of the Max application.